
What happens in your child’s throat when they speak? Most of us never think about it—until we notice a child struggling to project their voice, mumbling through presentations, or losing their voice after reading aloud.
This lesson transforms that invisible process into conscious control. By exploring just two sounds—’F’ and ‘V’—your child will discover something remarkable: their voice isn’t random. It’s an instrument they can learn to play.
The difference between ‘F’ and ‘V’ is tiny (just a vibration in the throat), but understanding it unlocks bigger questions: Why do my vocal cords do that? What else can I control about my voice? Why do some sounds tire me out while others feel easy?
These aren’t just pronunciation exercises. They’re the foundation of vocal confidence—whether your child is presenting to a class, reading to siblings, or simply learning to be heard.
By the end of this lesson, your child will be able to:
					Hello again, young explorers! In our last lesson, we discovered the science behind 'S' and 'Z' sounds. Today, we're investigating two sounds that seem almost identical—but aren't. Get ready to become a voice detective!

Put your hand gently on your throat. Now say "FFFFF" like air leaking from a tire. Feel anything vibrating? Probably not much.

Now say "VVVVV" like a buzzing bee. What changed? Your fingers should feel a buzz—that's your vocal cords waking up!

Let's understand exactly what's happening in there.
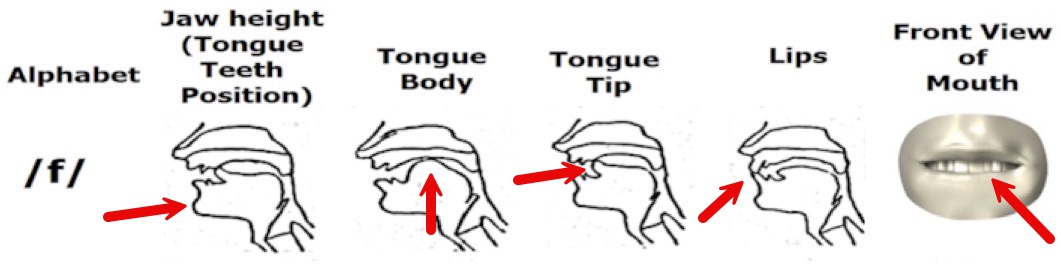
To make the ‘F’ sound:
To make the ‘V’ sound: Everything is the same—except your vocal cords vibrate, adding that buzzing quality.
This is why ‘F’ is called voiceless (no vocal cord vibration) and ‘V’ is called voiced (vocal cords engaged).
Say these word pairs slowly. Can you feel the switch between voiced and voiceless?
Same mouth position. Same lip-teeth contact. The only difference is whether your throat is buzzing or silent.
Pause here for a conversation with your child:
Record a baseline. Have your child read this paragraph aloud and save the recording:
“In the quiet evening, the small waves gently talked to the sandy beach. Each word was clear and floated easily through the cool air. As I listened, the soft sounds of the waves mixed with the whispering leaves, making a beautiful song that made me feel calm and happy about the world around us.”
Have them read it 2-3 times. Between readings, ask:
Don’t worry about finding answers—the questions themselves are the exercise.
Make a sustained “FFFFF” sound as you exhale. Keep it going as long as comfortable.
What to notice: How does the air feel passing between your teeth and lip? Can you make the sound last longer by controlling your breath?
Switch to a sustained “VVVVV” sound during exhale.
What to notice: What changed in your throat? Can you feel the vibration? Does ‘V’ use more energy than ‘F’?
Keep making the ‘V’ sound, but let it get lower. Start comfortable, then drift down like a slow elevator descending.
What to notice: Does your throat feel different at lower pitches? Does it take more or less breath?
Now go the other direction—let your ‘V’ sound travel higher, then lower, like a siren.
What to notice: Is one direction easier than the other? Where does your voice feel most relaxed?
Place your fingertips gently on the front of your throat while making a ‘V’ sound.
What to notice: Can you feel the vibration? What happens when you change pitch—does something move up or down?
Alternate rapidly: “F-V-F-V-F-V-F-V…”
What to notice: Can you feel your vocal cords switching on and off? Is there any tension in your jaw or throat?
Make both sounds at different volumes—whisper quiet, speaking level, and as loud as comfortable.
What to notice: What changes in your belly and chest when you get louder? What happens to your breath?
Make a loud ‘V’ while intentionally letting your belly stay full and round as you exhale.
What to notice: How does this affect the sound? Does it feel easier or harder than usual?
Now try a loud ‘V’ while pulling your belly in and expanding your chest.
What to notice: How is this different? Which way of breathing supports the sound better?
While making a sustained ‘V,’ let your attention shift between belly and chest—notice them working like a seesaw.
What to notice: Can you find a rhythm that makes the sound feel effortless?
Keep making sounds, but try to use less effort in your jaw, tongue, and throat.
What to notice: Can you make the same sound with half the tension? What happens if you relax your face?
Slowly raise the pitch of your ‘V’ while keeping your fingertips on your throat.
What to notice: Does your larynx rise when the pitch rises? It doesn’t have to—this is a habit, not a requirement.
Try raising your pitch WITHOUT letting your larynx rise. You might need to engage your belly more to support the breath.
What to notice: This might feel strange at first. That’s normal—you’re discovering a new coordination.
Rest. Just breathe. Notice any sensations in your face, mouth, lips, tongue, throat, chest, and belly.
What to notice: Does anything feel different than before the exercises? More open? More relaxed? More alive?
Roll to your side, sit up slowly, then stand.
What to notice: Has your posture shifted? Do you feel more grounded? More aware of your body?
Return to the paragraph:
“In the quiet evening, the small waves gently talked to the sandy beach. Each word was clear and floated easily through the cool air. As I listened, the soft sounds of the waves mixed with the whispering leaves, making a beautiful song that made me feel calm and happy about the world around us.”
Read it several times standing up. Then:
Signs of progress to celebrate:
If they’re struggling:
What’s next: This lesson builds toward greater vocal range, expressive reading, and confident public speaking. The awareness developed here transfers to all voiced communication.
					Fantastic work today! You've just learned something most people never discover: your voice is an instrument, and you're learning to play it.

Every time you speak now, you can notice—are my vocal cords buzzing? Am I using too much effort? Could this feel easier?

That awareness is the foundation of a powerful, confident voice. Keep exploring, keep questioning, and keep listening to what your body is teaching you.